30 Jul 2015

Ink Dusters, Pooh quote stamp, and make your own Stamp Masks


I have received these happy packages One from Inkylicious and one from Stix2 .

I am especially looking forward to using the ink dusters as I have had terrible problems with some stencil brushes I have used before. The hairs came out, and not just one or two but bunches of them! (See pics below) The company sent me another set and the same thing happened again, so I looked for alternatives and these ones look good. 

Oh at the same time this lovely stamp found its way into my basket. The quote is from a Pooh film, but it is not from the original books by A.A. Milne. I hope to a make a card with it soon.

At Stix2 I found A4 sheets of masking paper, so I can now create my own masks for stamps, and I may try to create a mask  for  the London skyline. A bit ambitious, but worth a try! Stix2 have free postage in July.
I have some Blog Candy to give away on Saturday.......

28 Jul 2015

My Pastel Painting of Elvis

My sister was recently sorting out all of the clutter from our attic, when she came upon some of my pastel paintings from nearly 30 years ago! 

I particularly like this one of Elvis. I could never do that now! It is especially remarkable because at the time I painted it I was very, very seriously ill, and I painted it in bed.

 A few months later I was near to death in a coma and was not expected to survive, but that is another story......

It was nice to see this painting again, I now have it in a frame and hanging on my wall. I am of course still an Elvis fan.

25 Jul 2015

Crafty Individuals Face Value


I don't think I have ever made a Christmas card in July before! 

Crafty Individuals have a Challenge this month with the theme of "Face Value". So I used their lovely deer stamp on my card, and created a snowy landscape.

 I have a feeling this deer maybe Prancer!

Thank you so much for looking.

GIVE AWAY
 

It's my Birthday on the 1st of August, and to celebrate I am giving away a Clarity Stamp Stencil. Also included will be a booklet of ideas on how to use it. Which is  written by Barbara Gray.
I am not giving any clues as to which stencil it is, but if you would like a chance to win it, just pop back on August 1st!


17 Jul 2015

Fields of flowers tags


It's my sister's birthday next week, so I wanted to make some summery tags to attach to her gifts. I have used Lavinia stamps. I wanted to create a field of neverending beautiful flowers.

 I would like to enter these into the following challenges


Thank you so much for looking


16 Jul 2015

Magical Fairy Garden


My mothers friend often gives her broken bits of jewellery and various sparkly bits, for me. As she thinks I can always do something with them!

The last little collection had  a large sparkly gem pendant included, and a very pretty flower which was once an earring. I immediately thought of fairies, and my Lavinia Stamps.


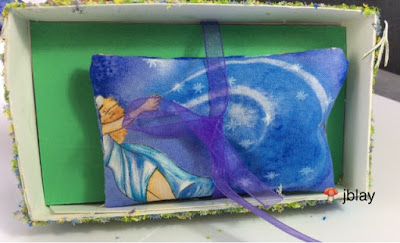
I decided to make a 3d  Fairy scene. I cut down a camomile tea box to use as my stage, and started stamping. I carefully cut out my fairy and glued her to  the top part of the pendant, and glued the underneath  to the box. Then I began stamping a vast array of lavender flowers and bluebells. I wanted the fairy to be sitting amongst a host  of flowers. I cut out all of the flowers the lavender was a real challenge!

I decided not to use the poppies and chose bluebells instead 


Even though I used thickish card the flowers did not want to stand up, and they just flopped when I inserted them into the box. So out came the trusty pva glue, and I gave them a good coating. When they were dry I managed to slot them all  in, including of course the one special earring flower. I then  used three colours of flowersoft to cover the box and to make it look like grass and flowers. Of course as it is a fairy special place it needed a few drops of stickles added too!


I made a lavender bag to go underneath the box. I had some left over dried lavender from the garden  last year. This years is drying nicely. I attached the lavender bag with a ribbon to the underside of the box so it can be taken out if needed.


I am going to give this to my Mothers friend Irene, to thank her for all the little bits and pieces she sends to me. I have to admit though, I sometimes have no idea what some of the bits are......

I would like to enter this into the following challenges

Lavinia Stamps Add a Flower

Craft Stamper Take it Make it Anything Goes

Thank you for looking, I hope you can smell the lavender.


8 Jul 2015

Clear Stamp Storage Solution

I had a  splendid stamp binder which I think was made by Papermania. It's zipper broke last week
 ( probably caused by overfilling!) and since then I have been trying to find a better solution for storing my treasured stamps. 

I decided to try an Ez Mount binder, which arrived today ( you have to buy separate page inserts too) The stamps stick directly to the pages, although some of my stamps were playing up and wouldn't  stick. So  I gave them a little bath, and then they were fine.

My stamps enjoying a bath

The only problem I have found with the new binder is that all the stamps which had happily lived  in my original binder won't fit in the new one.

Ez Mount Binder
So I am now not sure whether to buy another Papermania binder, and hope the zip doesn't break again or get another Ez Mount one. The price is about the same. By the time I have saved for  one I may have decided.......


14 Jun 2015

Craft Stamper Take a Technique Texture


I have made this seaside 3d card/book for my sisters birthday this July.

I originally used a template to make the book, but.... well it sort of got a bit complicated and I ended up doing my own thing. Remarkably it still looks like a book!

I used Phyliss Harris's  gorgeous little girl and dog stamp to set my seaside theme. I created the background with dye inks, and then stamped boats and birds on separate card and cut them out. I dangled one seagull on some invisible thread. 

I made a white cliff with grunge paste and put a light house on top to keep the boats safe!

I used decoart texture sand paste to make the sand, it was an off white colour so I added some butterscotch ink to make it look more sandy.

Some white net made some swishy sea waves or sea horses as I always call them.

I made a beach scene to go on the front cover, and a background scene for the inside cover with my birthday message.


Thanks for looking, and happy summer time to everyone.  


I would like to enter this into Craft Stampers Take a Technique Texture


 photo copyright.jpg
blogger template by envye