Showing posts with label mixed media. Show all posts

23 Oct 2016

Autumn Card


This is the first card I have made since my op. I still can't hold a pen, paintbrush etc or use scissors. I can spray and sponge though : ) this is the result .

I used a mixture of Luscious Pigments and water in a spray bottle. The little trees are from the Indigoblu Winter Woodland stamp set.

Thank you so much for stopping by.

I would like to enter this into the following challenges

Craft Stamper Autumnal Creations

Creative Artiste Anything Mixed Media

Stamping Sensations Autumn

That's Crafty Clean and Simple


20 Oct 2016

Pooh is 90 years old Commemorative Frame


Our Silly Old British and Much Loved Bear Winnie the Pooh, became the grand age of 90 on 14th October 2016. So I made this Enchanted Place to commemorate the occasion.

My Blog is called The Enchanted Place after the Enchanted Place in the Pooh stories by A.A.Milne.I Love, Love, Love Classic Pooh by E.H.Shepard and A.A.Milne.

I made this before I had the op on my finger, the good news is I am slowly getting movement back.I hope to be back crafting again soon!

I cut the template above in card and covered it in Modelling Paste, dabbing it with the spatula to raise it up a little. When dry I used Hot Coca and Peppermint Tea paints to cover it.

I found the silhouette of Classic Pooh and Christopher Robin online and printed it out. I then traced the outline and transferred it onto black card and cut it out.I adhered their feet to the top of the hill.

The frame was an inexpensive wooden frame, which I covered in Flitterglu and Chocolate Box Megaflakes.

I painted some card with Grandmas Teacup, Wimberry and Iced Gem paints. I cut it to fit the inside of the frame. I used black Archival ink to stamp the Pooh sentiment from the Caitlin Stamp set in the top right hand corner of the card.

I found some black number stickers in my bulging old sticker box, and I covered them with Megaflakes.

I picked some twigs and herbs from the garden and coated them in Slap it On. When dry I adhered them to the hill and the front of the frame.

Many Happy Returns Pooh!

Thank you for visiting, I hope to see you again soon

I would like to enter this into the following challenges.

Stamps and Stencils Elements of Nature

Craft Stamper Autumnal Creations

Products I used


10 Aug 2016

Hobbycraft Half Price Art Sale


Hobbycraft have a half price sale on art supplies at the moment. I picked up a mixed media pad, a watercolour pad, and a big tub of gesso, all half price! So if you are near a Hobbycraft it's worth stopping in and stocking up!


27 Jul 2016

The Voice of the Sea Speaks to the Soul Mini Book

For this months challenge at Mixed Media Mojo I decided to create this simple little 6 x 6 chipboard mini book.


I started by coating the cover with some gesso, the gesso gives it a good base to hold inks and paints. When it was drying I brayered some Stonewashed ink onto the top of my gelli plate, followed by some swipes of Sail Boat Blue ink. I was careful to leave some spaces in between the swipes as these would become the white waves.
 

I laid the cover onto the plate and pressed it down firmly, and hoped !
 

It came out Ok is sh !
 

I used watercolours to go over the sea and waves and added some sand texture paste to the bottom of the cover to create the beach effect. When the sand was dry I painted over the top of it it with watercolours.I also glued some real shells onto the beach.

You may like to try a recipe by Tim Holtz to make your own sand. I don't have any of the products he used so I couldn't do it, but if you have those items you may like to give it a try as it looks interesting!

I stamped my sentiment over the sky in Archival ink, and finished the book by adding lots of threads and ribbons to the bookrings.


Why not join in the fun and create something for this months theme. The twist is optional, and everyone of all experience levels is very welcome to join us at Mixed Media Mojo


13 Jul 2016

Once upon a notebook

I recently found this cute little notebook. I decided to alter the cover by using A lovely Teddy stamp by Crafty Insividuals, and colouring her with watercolours.I created the background by using chalks on water I have written a short tutorial on how I did this here. I then added a few spalshes of watercolours.

I tied a lot of pretty organza ribbons onto the book spiral.

Thank you so much for visiting.

I would like to enter this little notebook into the following challenges.

Crafty Individuals Mini's Challenge

Artistic Stamper All Things Bright and Beautiful

Craft Stamper Anything Goes with stamping

That's Crafty Feminine Challenge

1 May 2016

Magic is Something You Make


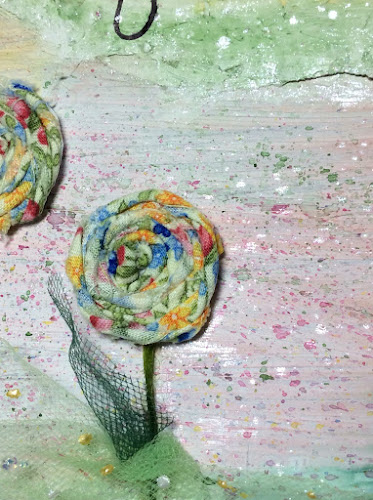
For the canvas I used a chipboard backing from a paper pad and coated it with gesso.

I glued layers of tissue paper on the top part of the canvas. When dry I used watercolours on top of the tissue and then stamped the sentiment. The remaining canvas was coloured with dye inks and splattered with watercolours.

I made the flowers with strips of fabric which I rolled around and around into a circle. Some twisted green net became its leaves.

I finished by adding a little sparkle and some cross stitches in a silver thread.

Thank you for visiting.

Please take a look at all the fabulous projects from the Mixed Media Design Team we have a fabulous guest Designer this month Ingrid. I hope you will join in with the challenge this month, have fun!


6 Apr 2016

George picking flowers


Created by Jannet Blay http://gillslap.blogspot.co.uk/
It was a lovely sunny spring morning, so George picked up his basket, and skipped into the garden. He wanted to pick his Mum some flowers, because of course he had the best Mum in all the world.After he had picked a few George felt sleepy and gently snuggled down on the soft grass for a nap.....

I started making George's garden with a biscuit box and I covered the sides in lovely Indigo Blu papers. Green felt made the grass , I just scratched it up a bit to make it more fluffy.


Well no garden is complete without flowers, so I die cut a few. I then used water colours to add some colour to them and added a pearl dot in the middle.

I made the stems and leaves with some green wire.


Now George needed a basket to carry the flowers in, so I plaited some paper together to make a basket.

I put some lovely yellow ribbon with tiny pom poms on around the top of the sides.


George was getting impatient so I quickly coloured him with some watercolours and placed him on top of the grass. I then added lots of the flowers around him, so he was very happy and content.

This is going to be a gift box so I covered the bottom with some more Indigo Blu papers and cut a little door into the bottom. I think some chocolates or a gift card etc would fit inside ok.


I used an array of different medias to create this, I hope you like it.

Thank you for visiting George today, he loved seeing you.

Follow My Blog on Bloglovin or

Subscribe to Enchanted Place with a Reader


I would like to enter George Picking Flowers into the following challenges

Indigo Blu Challenge Yellow, Pink, Green

That'sCrafty All Things Bright and Beautiful

Creative Artiste Anything Goes

Vintage Journey Spring Is In The Air


1 Apr 2016

Think Happy Tin


I recycled an empty hinged tin of mints to make this fun little scene.

I started by lining the tin with card, I used some off cuts from some bleeding art tissue backgrounds which I had made a while ago. There are so many pretty papers available that the possibilities for creating the background are endless.

I chose this set of little silhouette stamps for my scene.

I stamped them all in black archival ink and carefully cut them out, but leaving a little tab on the bottom of them to glue to the grass later.

I cut a strip of card slightly longer than the width of the tin and fringed it to look like grass. I folded each side edge of the card and glued it to the inside side of the tin. I used two strips of grass, and then added the silhouettes onto the grass strip.

I die cut a tree branch and flowers, and glued the branch into the top of the tin and adhered some flowers. I stamped a sentiment on the lining inside of the lid.

I decided to use decopatch papers to cover the tin. Apparently you are meant to use expensive decopatch glue, but I have found that Pva glue works fine for me.

There are so many different scenes you could create inside of a little tin, why not give it a try!

Thank you so much for visiting today.

I would like to enter this into the following challenges

Creative Artiste Mixed Media Anything Goes

That's Crafty Bright and Beautiful, incidentally I bought the stamps I used here from That's Crafty, it was a few years ago but they may still have them.


 photo copyright.jpg
blogger template by envye