1 Apr 2016

Think Happy Tin


I recycled an empty hinged tin of mints to make this fun little scene.

I started by lining the tin with card, I used some off cuts from some bleeding art tissue backgrounds which I had made a while ago. There are so many pretty papers available that the possibilities for creating the background are endless.

I chose this set of little silhouette stamps for my scene.

I stamped them all in black archival ink and carefully cut them out, but leaving a little tab on the bottom of them to glue to the grass later.

I cut a strip of card slightly longer than the width of the tin and fringed it to look like grass. I folded each side edge of the card and glued it to the inside side of the tin. I used two strips of grass, and then added the silhouettes onto the grass strip.

I die cut a tree branch and flowers, and glued the branch into the top of the tin and adhered some flowers. I stamped a sentiment on the lining inside of the lid.

I decided to use decopatch papers to cover the tin. Apparently you are meant to use expensive decopatch glue, but I have found that Pva glue works fine for me.

There are so many different scenes you could create inside of a little tin, why not give it a try!

Thank you so much for visiting today.

I would like to enter this into the following challenges

Creative Artiste Mixed Media Anything Goes

That's Crafty Bright and Beautiful, incidentally I bought the stamps I used here from That's Crafty, it was a few years ago but they may still have them.


29 Mar 2016

Laugh Often Love Much

This is my first "recipe" card. Tando Creative have a challenge to use this recipe

1 x stencil

2 x stamps

3 x flowers

I love Tando Creative and I have a lot of their lovely chipboards.

I created the background with dye inks and applied them with ink dusters. I used a leaf stencil in the corners. Two stamps, provided the sentiment, and the grasses.

I put some gesso on my Tando flowers and the coloured them with water colours. I cut them off the grass piece they were on,and glued them to the bottom of the picture.

Thank you for looking.

I would like to enter this into

Tando Creative Recipe Week


28 Mar 2016

Dreams published in Craft Stamper

Now that May's Craft Stamper has been published, I can post this card. I love this Dreams stamp by Inkylicious. I started by making a background on the gelli plate, by using a brayer to add some inks. I dipped the broken edge of some polystyrene into some ink and stamped it around the edges. (you often get polystyrene in packaging so I always save mine !) Using the polystyrene gives a random dotted effect.

I chose a Kraft card blank, and gently twisted some raffia before placing it down the left side of the card.

There are lots of lovely projects to read in Mays Craft Stamper plus a free blossom stamp!

I was so thrilled to be published in Craft Stamper again, thank you.


26 Mar 2016

Old pastels

Last year my sister found my old wooden box of pastels in the attic. They are well over 30 years old. Today I tried them out to see if they are still ok....and they are! More then 3 decades later and they are still perfect, amazing!

When I picked them up I reflected on how very much my life has changed since the last time I used them.

I am getting used to the feel of them again, and started on a portrait, I'm not very good but I will persevere.


22 Mar 2016

Happy Easter

A water coloured Easter card.

I Hope you all have a very happy Easter time!


17 Mar 2016

Spring Deers

I stamped Forest Friends by Penny Black with black Archival ink onto water colour paper. I love water colours and I used them to colour the beautiful deers.

I created a background with dye inks and stamped a tree branch, then added some pink flowersoft for blossom.

Thank you for visiting.


I would like to enter this into the following challenges.


Penny Black Featrue a Creature

Try it on a Tuesday Nature

All Sorts Challenge Spring Is In The Air

Craft Stamper Anything Goes

Artistic Stamper Springtime


16 Mar 2016

Wild Poppy Meadow Box

I couldn't bear to throw out this lovely little biscuit box, so I decided to cover it with decoupage papers. I used Wildflower Woods Paperpatch. I always use PVA glue with my decoupage, it is much less expensive than the special decoupage glue and seems to work ok for me.

My favourite flower is the wild poppy, and Crafty Individuals Poppy Meadow Stamp fitted perfectly on the front of the box ! I used watercolours to colour the image.

For a finishing touch I put some lace along the side of the lid. This lace had a double sided tape already on it, which was helpful!

I am going to give this to my sister for Easter, ....... I better find something nice to put in it first !

Thank you so much for visiting.

I would like to enter my Poppy Meadow Box into the following challenges.

Crafty Individuals Boxes of All Sorts

Try it on a Tuesday Nature

All Sorts Challenge Spring Is In The Air

Craft Stamper Anything Goes


13 Mar 2016

Alice in Wonderland

I used the lovely Alice stamp set by Carabelle Studios and coloured Alice and the White Rabbit with watercolours. I love using watercolours they give such a delicate pale look.

I stamped lots of roses, and then created their stems from some old book pages which I had inked up green.

I used grunge paste through a diamond stencil and coloured it red when dry. You can colour grunge paste before applying, but I forgot to do that this time!

Thank you so much for looking, I hope you enjoyed meeting Alice!

I would like to enter Alice in Wonderland into the challenges below.

That's Crafty Stencils and Masks Challenge

Craft Stamper Anything Goes

Artistic Stamper Springtime

Creative Artists Anything Goes

Try It On A Tuesday Feminine and Fancy


2 Mar 2016

Over the Moon

I am Over the Moon that my Mary Poppins picture was selected as The Design Team Winner at Craft Stamper Magazine !

Thank you so very much. I can hardly believe it as there were so many wonderful entries.


Life's An Adventure

I created this for my Mother's Birthday, and I thought I would share how I made it, in case anyone was interested.
I stamped my "Life's an Adventure" using black Archical ink (it is waterproof) onto watercolour paper and used Aqua Marker pens to colour her. I did not use the pens directly onto the paper, instead I dabbed a little into my pallete and added a teeny bit of water. I added some pink flowersoft to accentuate her hair band.
I die cut a lot of small flowers, and then used a coloured pencil to edge them in a slightly darker shade. I used Liquid Pearls in Buttercup to make the centre of the flower. I bent the flowers up a little to try and make them look more realistic and not so flat.
I then Moulded green plasticine into a small hill shape, and scratched it up to look like grass.
When you have decided the size you would like your tree to be cut a length of 2mm thick brown wire to make the trunk and firmly place it in the centre of the hill.
Cut shorter lengths of 1mm thick brown wire and very tightly twist it around the trunk where you would like your branches to be.
Glue the flowers onto the branches, I used pva glue. I glued my swing girl very carefully onto the tree. Where she seems to be very happy!
I hope that I may have inspired you a little....
Thanks for reading.

I would like to enter this into the following challenges
Artistic Stamper Springtime
Tuesday Taggers Feminine and Fancy
Die Cut Divas Something Spring
Creative Artiste Anything Goes
Tando Creative Anything Goes

20 Feb 2016

Tags

I made a few simple tags with the backgrounds I created from my many experiments with bleeding art tissue !

Thank you so much for looking.

I would like to enter these tags into the following challenges

Artistic Stamper Heart Art


19 Feb 2016

A surprise and finally finished 2015 book

I had a lovely surprise this evening. My Believe card was selected as one of the top five at The Allsorts Challenge Blog.Thank you so much, there are so many very talented ladies taking part I was lucky to have been chosen!

Today I finally finished my 2015 em err do I call it a scrapbook,or a diary or a journal? It's certainly not an Art Journal, that is something I want to eventually try my hand at, it's too small for a conventional scrapbook.... Em...oh well I will just call it a book recording 2015.

I covered my book in a cloud fabric and I cut out Classic Pooh and Piglet from some other fabric and stitched them on. I added a little bit of stuffing to Pooh to make him stand out. I cut out and then stitched on lots of wild poppies. I don't have a sewing machine and my hand stitching is not too wonderful so please don't look too close!


The Front Cover
Inside the front cover.
 

One of the inside pages.

Another page.

Thanks so much for looking. Have a nice weekend.


16 Feb 2016

Believe

I tried my hand at making a Bokeh background ! I am going to share my discoveries in my attempts at creating Bokeh backgrounds soon....

I added some sentiments and of course a fairy. There is also lots and lots of glitter, but I am not sure that it shows up.

Thank you so much for flying by.

I would like to enter this into

Country View Challenges create your own background

All Sorts Challenge Circles

14 Feb 2016

Happy Valentines Day

Happy Valentines Day !

Thank you for looking.

I would like to enter this card into the following challenges

Artistic Stamper Heart Art

Try It On a Tuesday Fine Romance


13 Feb 2016

Guess who I saw flying over London!

I thought I caught a glimpse of Mary Poppins flying over my rooftop recently, so I made this little picture!

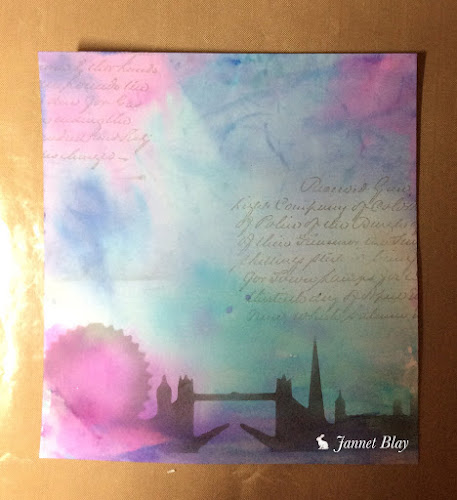
I created the background with bleeding art tissue. I searched on google images for a solid silhouette of London's skyline. When I found just the right one I printed it onto card. Then I took my time to very carefully cut it out to create a stencil. There are many skyline images of Paris, New York etc, so you can travel the world in your pictures!

I placed the stencil on the bottom of the card, using masking tape to hold it in place. I swept black ink into the stencil using a make up sponge. Then I lightly added a calligraphy text stamp to the background.

This background was the result.


The background was quite dark in places, and I wasn't sure if the Mary stamp would show up very well. So I stamped her onto a separate piece of card and then cut her out.

The stamp is Silhouette Lady with Umbrella from Lost Coast Designs

The calligraphy stamp is from Artisitic Stamper

Thank you so very much for taking the time to look.

I would like to enter this into the following challenges.

Craft Stamper Take a Technique Text Me

Country View Challenges Make Your Own Background


5 Feb 2016

How long is forever?

This months Challenge at Mixed Media Mojo is

Theme of Hearts and Twist of Paper Piecing

I love Alice in Wonderland and one of my favourite quotes is

“Alice:How long is forever?

White Rabbit:Sometimes, just one second.”

I originally created something different for the challenge, but I was not too happy with it. So the White Rabbit jumped forth and told me how to create him in another project - and here he is!

I would like to enter "How Long is Forever" into the following challenges

Creative Artiste Challenge Blog Anything goes with Mixed Media

Tuesday Taggers A Fine Romance

Thanks so much for looking.


4 Feb 2016

World Cancer Day


#WorldCancerDay for my best friend Marty - I miss you so very very much.


28 Jan 2016

Bleeding Art Tissue

I have recently been playing with bleeding art tissue, so I thought I would share my discoveries with you.

It is an easy, quick technique which gives really nice results. It stains your hands very prettily too! (It washes off ok)

The first thing I discovered is not all tissue bleeds, the packet has to say "Bleeding Art Tissue" I found this pack quite inexpensively online.

I started by randomly tearing small pieces of tissue, and laid them on my card. I used 250gsm card, it did buckle a little when I went a bit mad with the spray bottle, otherwise it held up quite well.


After laying the tissue I spritzed with water until I could see the colours bleed from the tissue. I found that the pastel shades did not give such a good result but the brighter, darker ones did. I then lightly brushed over the tissue, and then eagerly removed the tissue leaving a wonderful mix of colours.
If you crinkle the tissue up before applying, it gives a different textured effect.

I ended up with lots of different backgrounds, which I will use to create various pictures.

20 Jan 2016

Fairy Wishes

I created the background using bleeding art tissue.It is an easy and quick way to make colourful backgrounds. If you would like to give this technique a try, I will be writing a little article on the Mixed Media Mojo blog on the 27th January. I ve been playing a lot with bleeding art tissue recently, so I will be sharing my discoveries.

I added a good sprinkling of glitter to the dandelions and the fairy wings, but it does not show up very well in the photo. I also added some flowersoft to the flowers in her hair.

I would like to enter my Fairy Wishes into the following challenges.

Craft Stamper Take a Stamp

Artistic Stamper Anything Goes

Try It On A Tuesday Silhouettes

All Sorts Challenges Girly and Sparkly

Penny Black One For the Girls

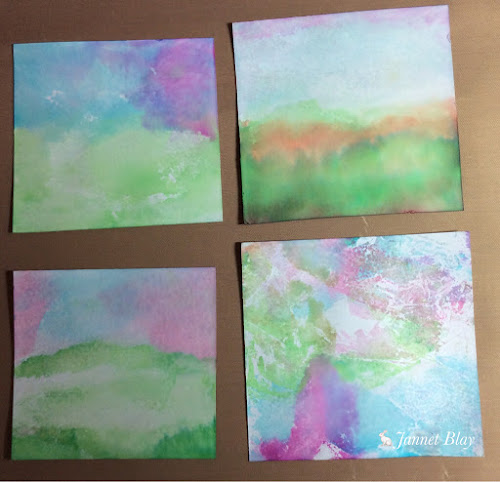
Below are more backgrounds which I created with the bleeding art tissue technique.


17 Jan 2016

Aloysious

I love Teddy Bears, and I recently rediscovered this adorable stamp of Aloysious in my stamp box. He was the famous bear from Brideshead Revisted. He is made by Indigo Blu, and is still available to buy. The Happy Birthday sentiment came with him.

I made a colourful background, and edged it with a pink sparkle pen, and then matted him onto gold card.

I would like to enter this card into the following challenges.

Indigo Blu All That Sparkles

Craft Stamper Take a Stamp

Artistic Stamper Anything Goes

Thank you so beary much for looking.


11 Jan 2016

Here's to LIFE !

30 years ago I was in a coma, and I was not expected to survive. When I did the dr told my parents that with the problems I had/have I could only reasonably expect to live for 2O years.

So today for a special treat myself and my mother went to Thats Crafty. It was our first visit there. We spent 45 mins in a traffic jam just trying to get onto the M25, it was quite a journey! It also turned out to be very tricky to find as its on a industrial estate!

Luckily we also took my portable ramp as there was a high step at the entrance. They are thinking of having a ramp put in soon, so that's really good .It was a nice shop with lots of quality goodies to tempt me.


Here are the lovely goodies I treated myself to.

A round gelli plate, a non stick craft mat, and some stamps and a stencil!

Afterwards we had a pizza, and I had a Prosecco and made a toast, I did not die and I have outlived the Drs prediction.
We toasted LIFE


6 Jan 2016

Happy 2016

Yesterday I received a surprise invite to join the Design Team at Mixed Media Mojo ! I of course accepted, and I am looking forward to it, the ladies there are all so talented. Thank you so much for the invitation.

Now I must put my creative thinking cap on !


 photo copyright.jpg
blogger template by envye